The following covers Smarthistory’s process for editing photographs using Adobe Photoshop. We also use Adobe Bridge for this process—this program comes free along with Photoshop. There are other free or inexpensive apps out there that do much of what Photoshop does, including Pixlr.
From a live webinar with Dr. Steven Zucker.
Jump to
- Selecting photos to edit
- File management
- Correcting for lens distortion and oblique angles
- Correcting color
- Sharpening and spot fixing
- Cropping and saving
Selecting photos to edit
We start by opening our entire set of photos of a given object in Adobe Bridge. This program allows you to easily view and select large sets of images.
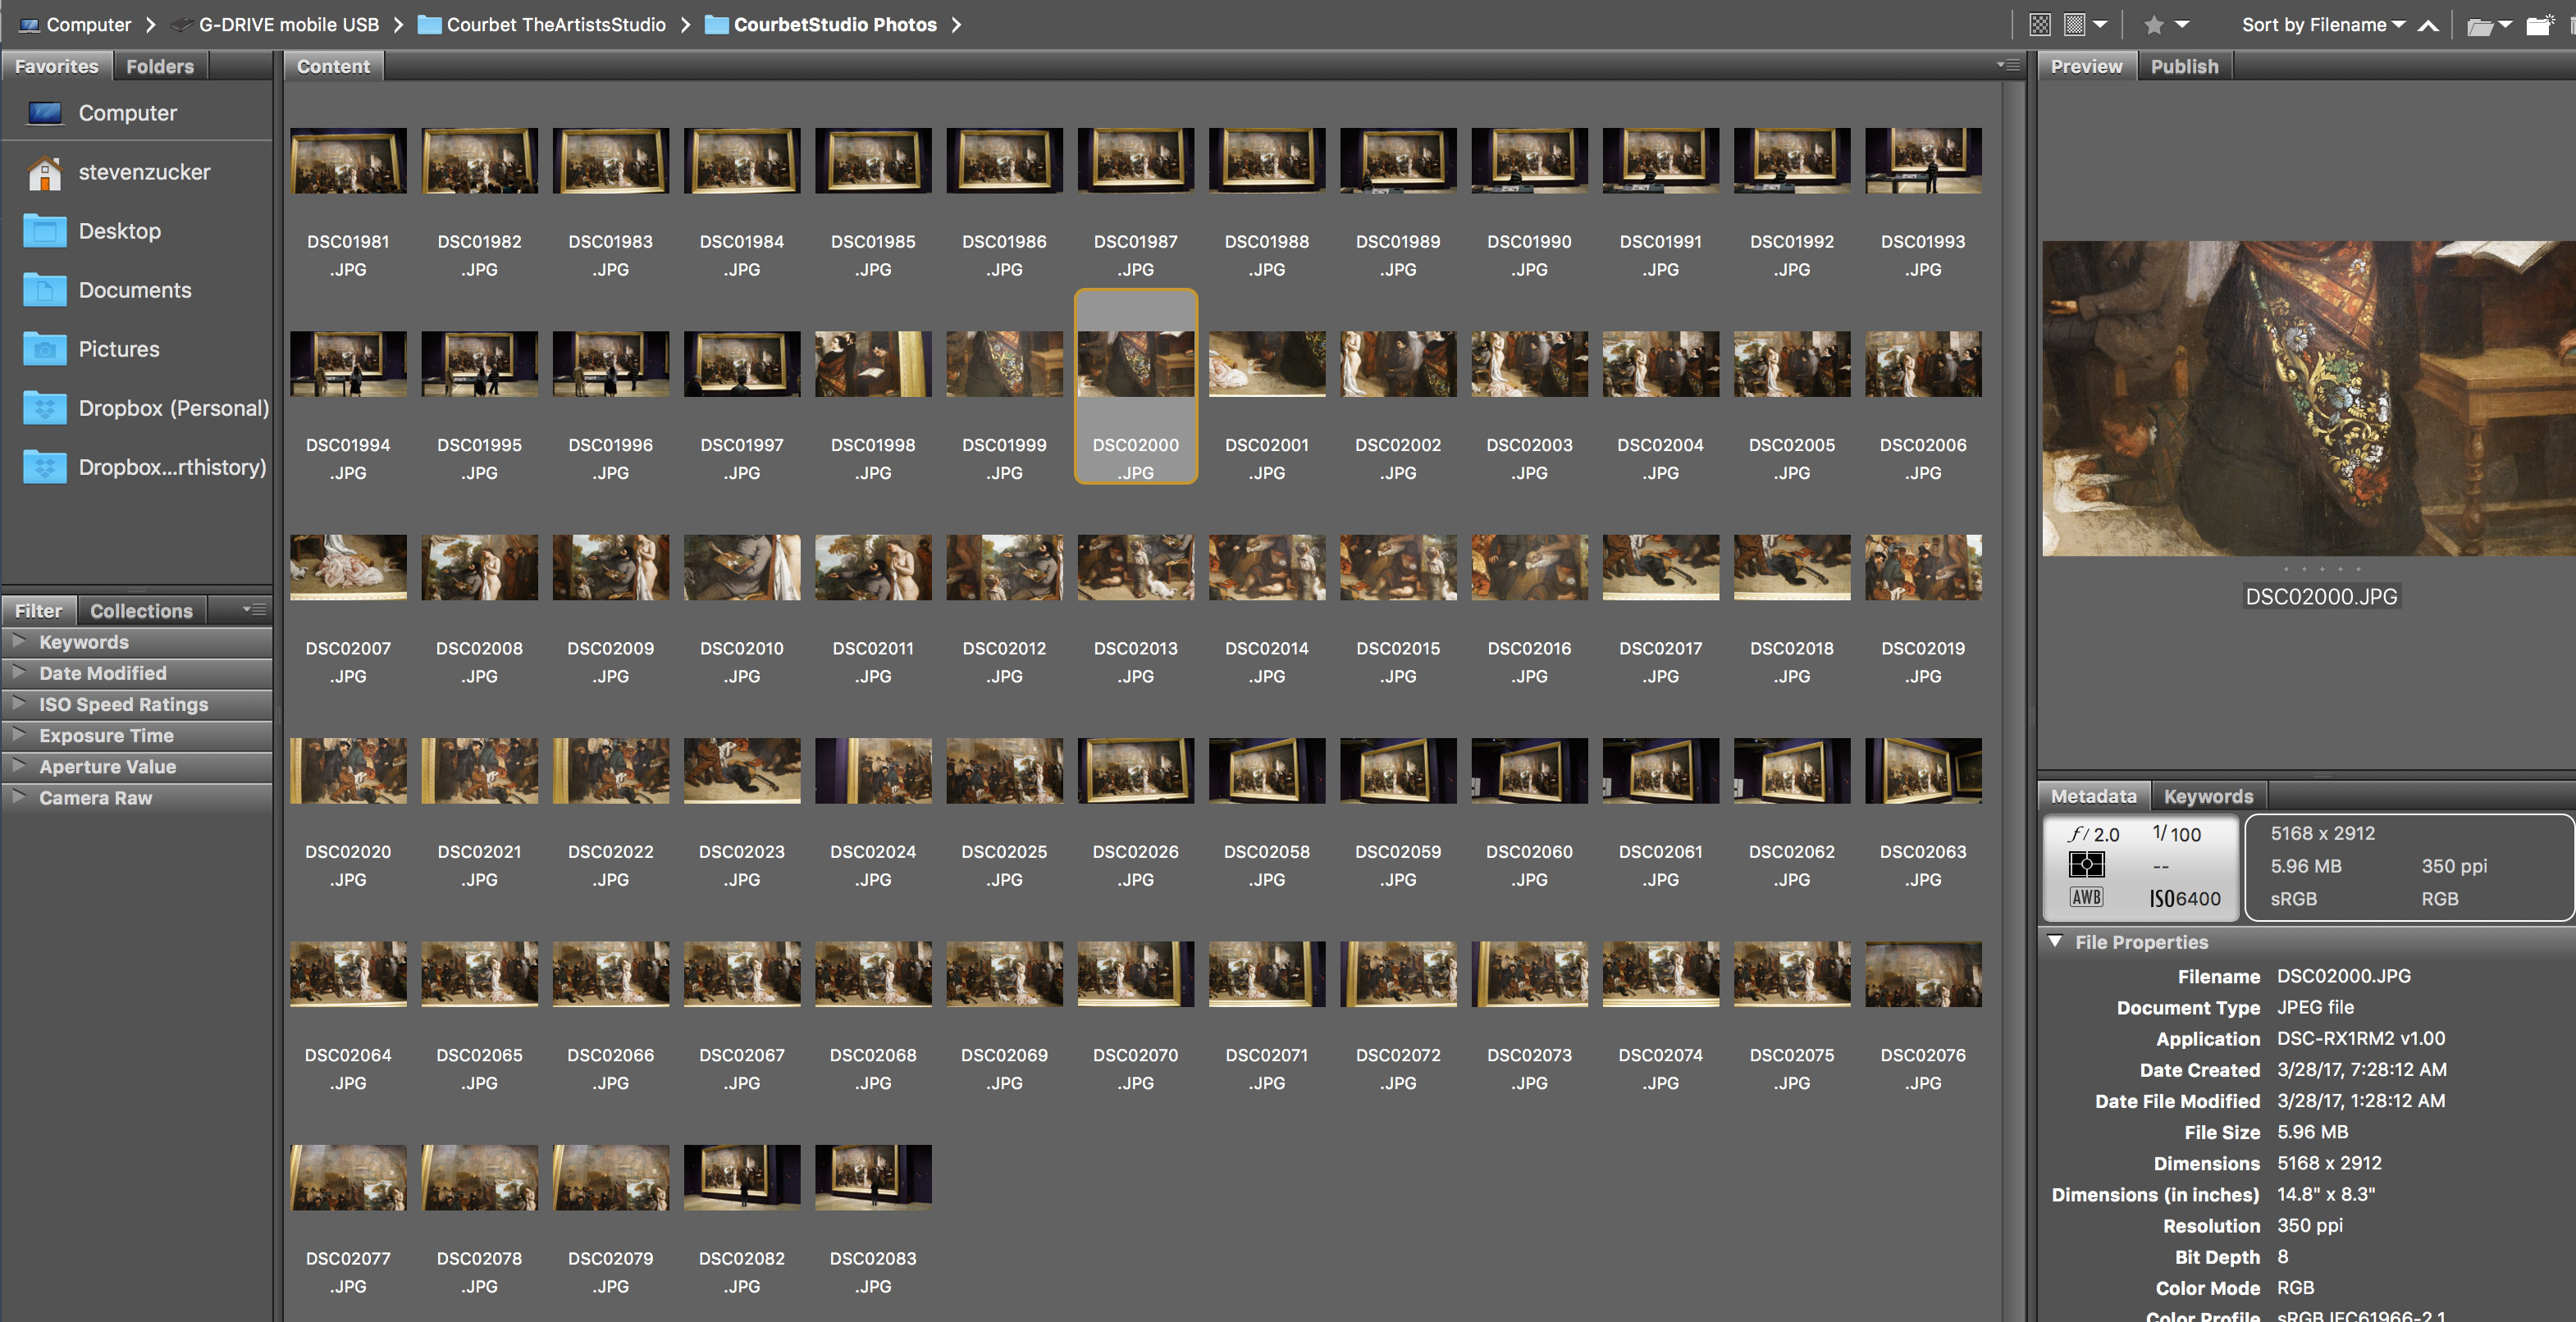
Looking at a set of photos in Adobe Bridge
For each angle that you shot, you’ll want to compare every similar image (ideally, you have shot 4 to 10 frames of each one). At this point, you are looking for clarity (the least-blurry image), and good framing.
We recommend comparing each of the similar images two at a time at 200% zoom. (You can do this in Bridge, or open them in Photoshop.) Pick a detail near the center of the image to focus on, and determine which shot is clearest. If two versions of the image are equally clear, pick the one with the superior framing, lighting, or least lens distortion—whatever you think will result in the best image.

Looking at a photo at 200% zoom in Photoshop. A similar photo has been opened in the other tab, and you can click back and forth between them to compare. This one is soft (not sharply focused), hopefully the next shot is better!
Double click a thumbnail in Bridge to open it in Photoshop or mark the images you want to use as “selected.” You can then easily copy these into a new folder to edit.
File management
Everyone has their own system for managing files. There is no one right way to do this; what is essential is that you create a system and stick with it. We recommend saving raw and edited files in separate folders so there is no risk of overwriting.
Correcting for lens distortion and oblique angles
Now you’re ready to bring your selected images into Photoshop and start editing.
The first thing we do is run Filter→Lens correction (if there are settings available for the camera and lens we are using).
Then, we correct the angles and alignment in the image by choosing Select all→Edit→Transform. We generally use the “Skew” function under Transform, though in some cases we judiciously use “Warp” to correct minor issues. We also use “Rotate,” “Perspective,” and “Distort” when needed. When using “Skew” be careful to maintain the work’s original aspect ratio. When using the “skew” function, it is helpful to adjust opposite sides of the image in opposite directions. This prevents the image from becoming too tall or too wide. Some people find Photoshop’s “guides” feature to be helpful in this process.
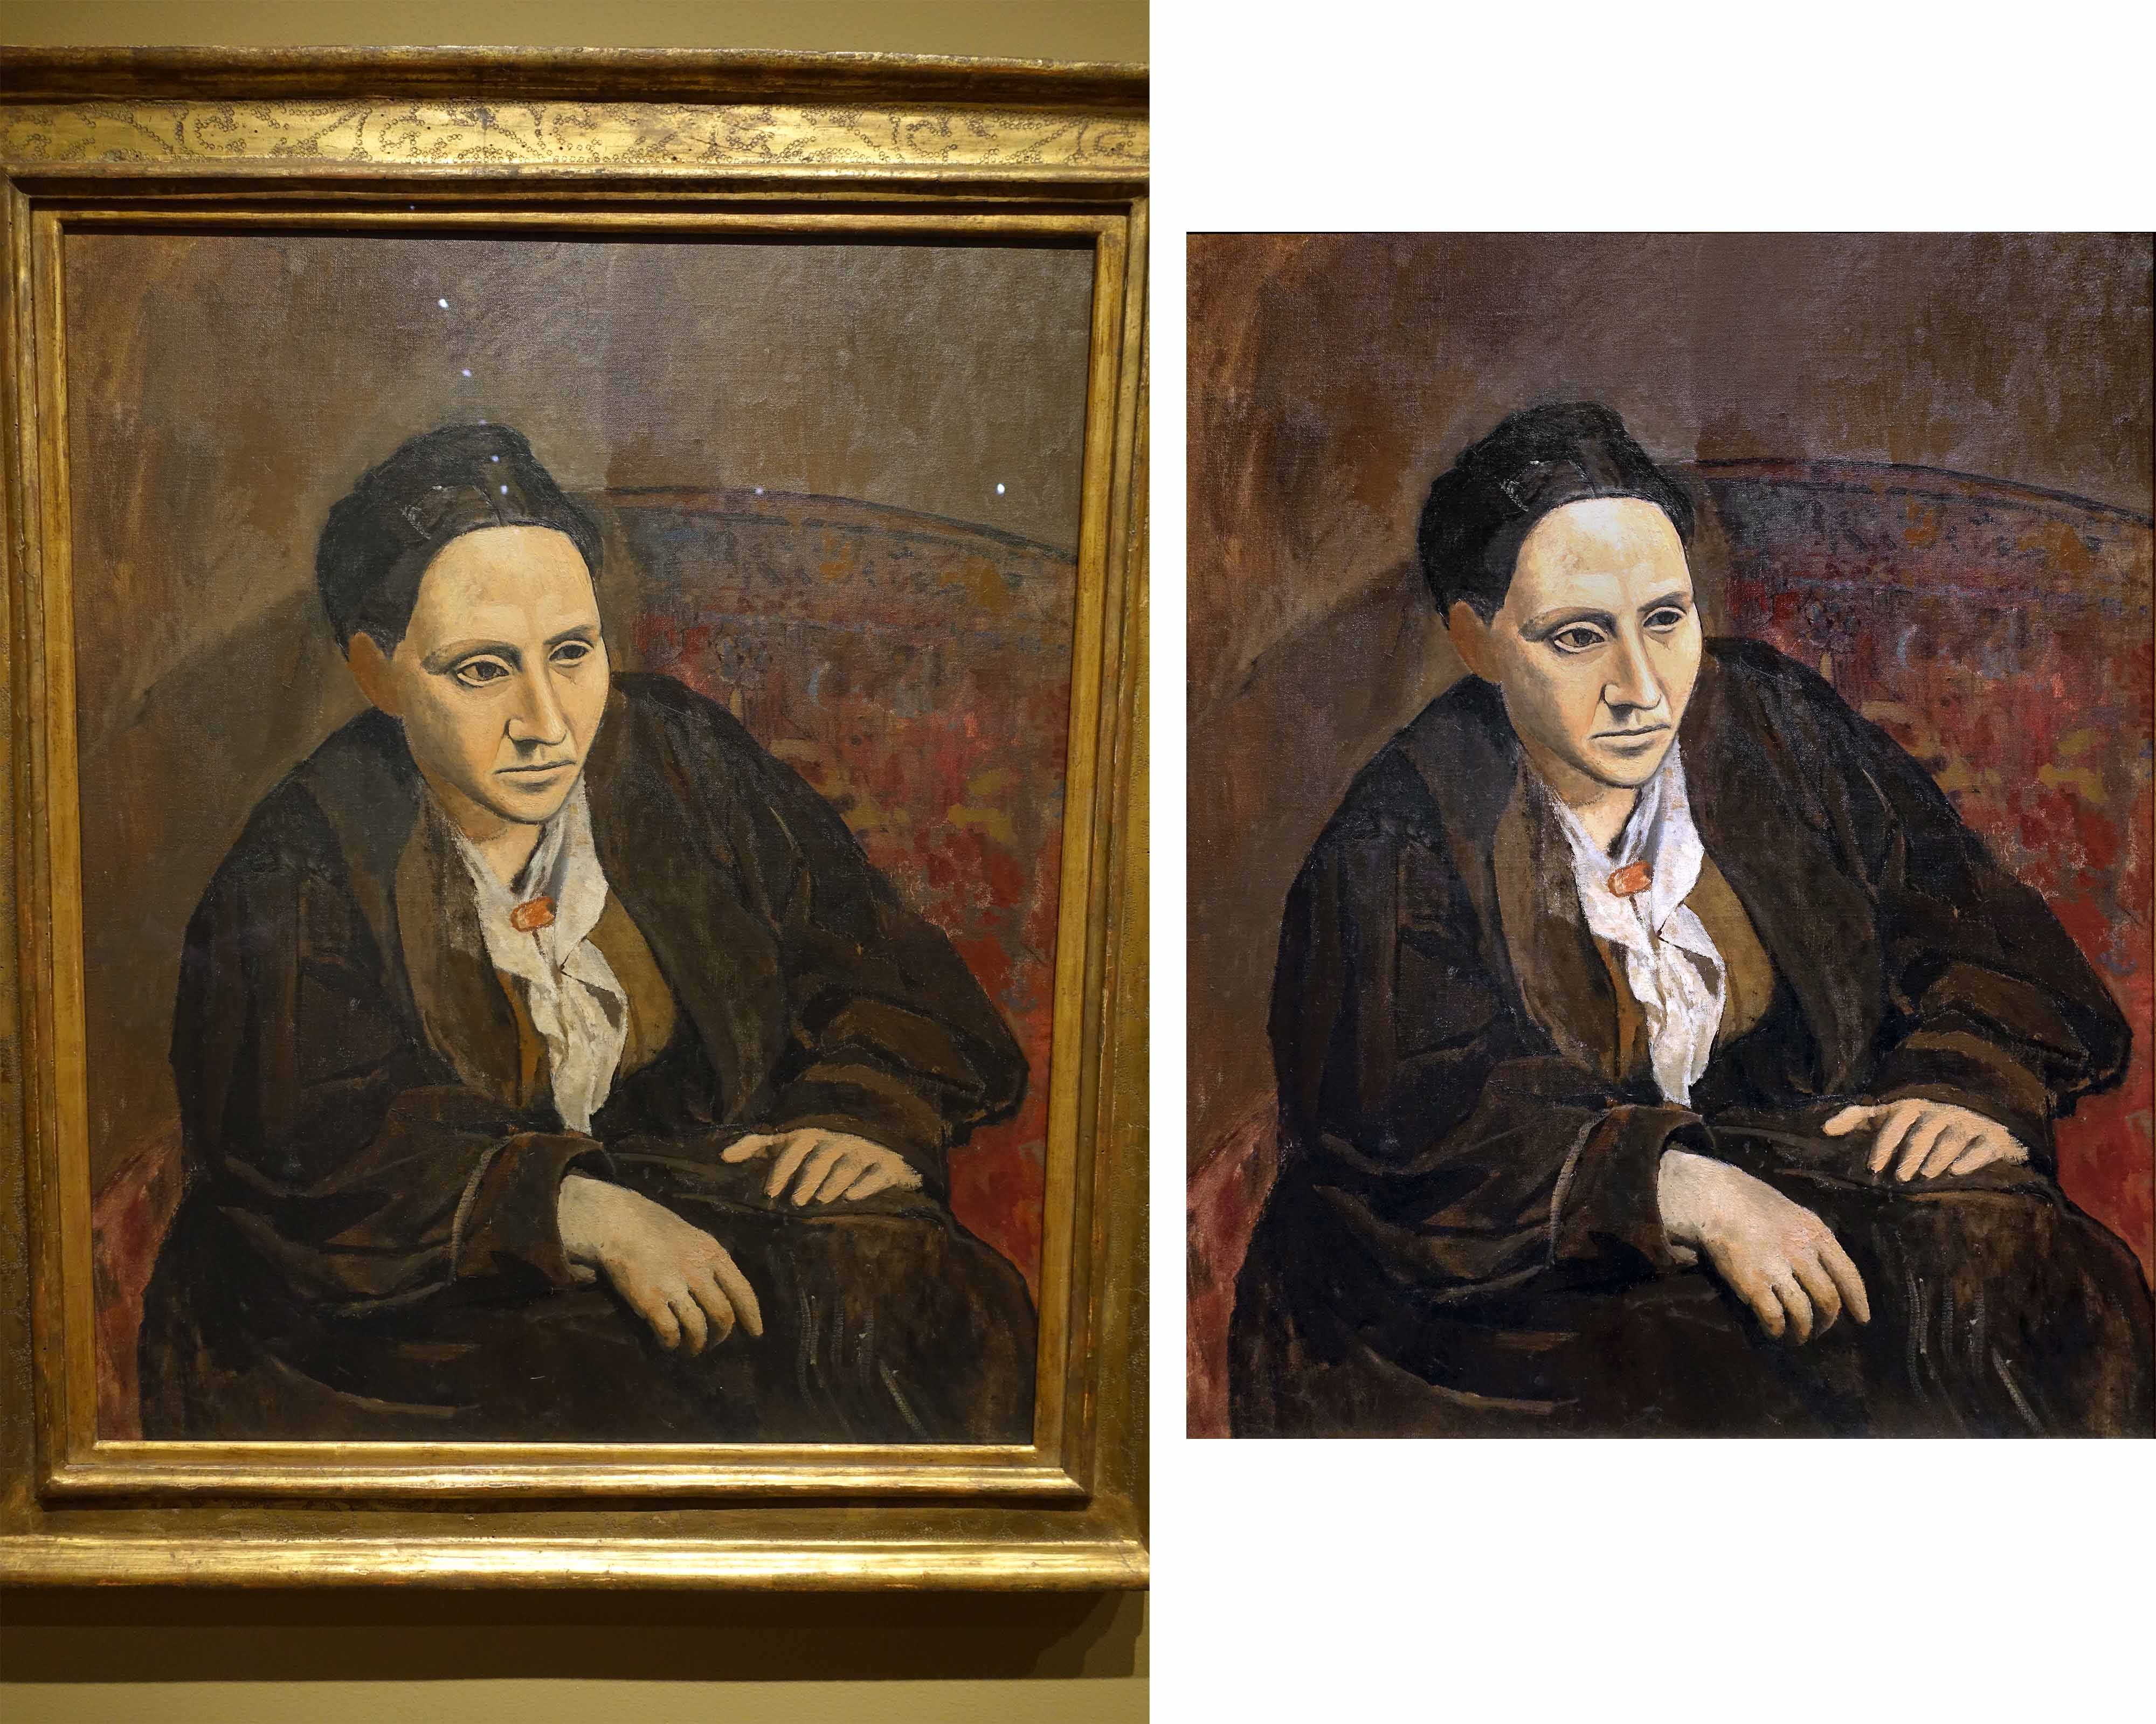
Left: unedited photo; right: photo edited for angles, color, and reflections. (Pablo Picasso, Gertrude Stein, 1905–06, oil on canvas, 100 x 81.3 cm, The Metropolitan Museum of Art)
Tip: Sometimes minor lens distortion can be an important clue to the position of the photographer in relationship to the work of art or architecture and should be retained.
Correcting color
Once your photo is adjusted for angles, you’ll want to look at color. Most cameras today tend to shoot on the warmer side, de-emphasizing cyans and blues. We like to correct for this using the following process: We start by selecting Image→Auto Color, then Auto Contrast and Auto Tone, in that order. We find that this will often give decent results, but sometimes we have to undo (use History if you’ve gone more than one step) and use just two or just one of these functions. Use your judgement here—the goal is fidelity to the object, keeping in mind that there is no “true” color, since so much depends on lighting conditions.
If the image still needs adjustment, we use the Image→Adjustments→Color balance. We may also employ Hue/Saturation at this stage.
You can use Brightness/Contrast and/or Levels to bring out details and adjust the contrast. The idea is to bring out as much detail as possible without oversaturating or washing out the image.
For smaller areas of the image that need adjustment, the Dodge and Burn tools can be helpful.
We think it’s okay to allow for slight changes in color between closeups and wide shots or gallery shots. Our eyes, and the camera lens, function differently in these situations and it’s alright to account for this.
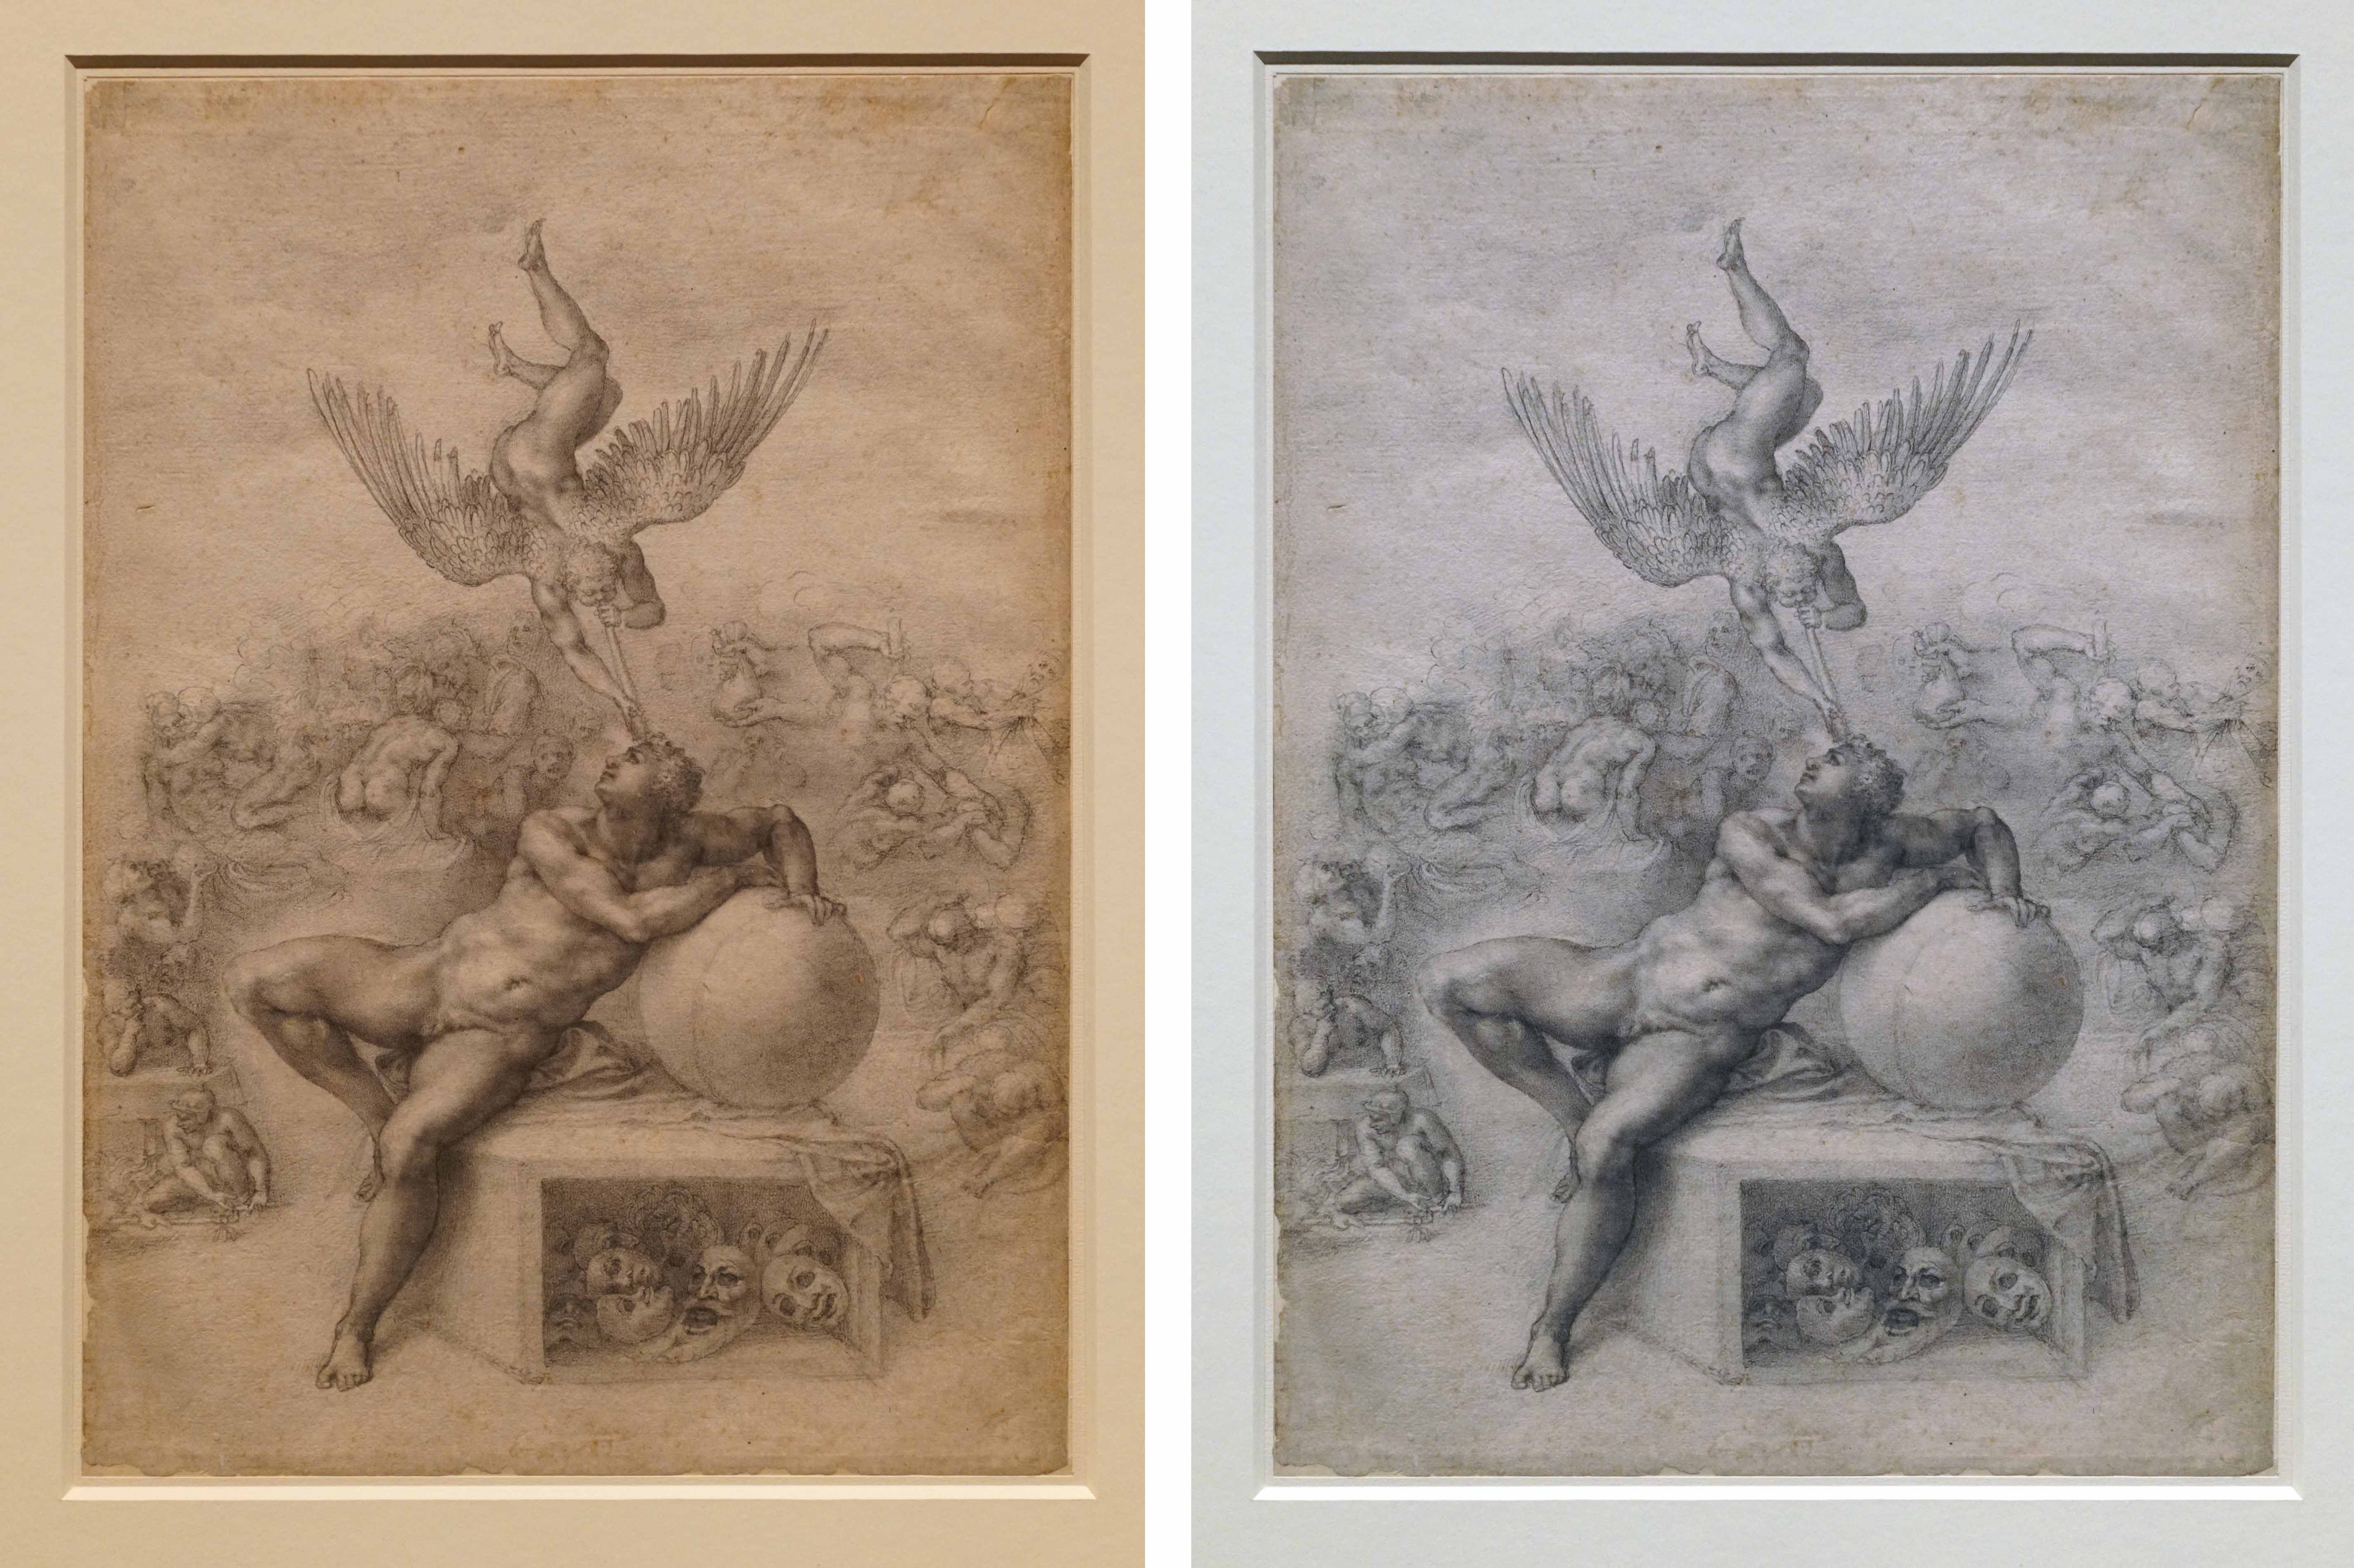
Left: unedited color; right: edited color. (Michelangelo, The Dream of Human Life, c. 1533, chalk on paper, 39.6 x 27.9 cm (The Courtauld Institute of Art)
Sharpening and spot fixing
When we have adjusted the angles and color, we often apply the Sharpen Edges filter to heighten details. Be careful not to over sharpen particularly with any print or image that is linear. We use the Healing tool and the Clone Stamp tool to correct for scratches, white spots, reflections, and/or to build a little background if necessary after adjusting angles.
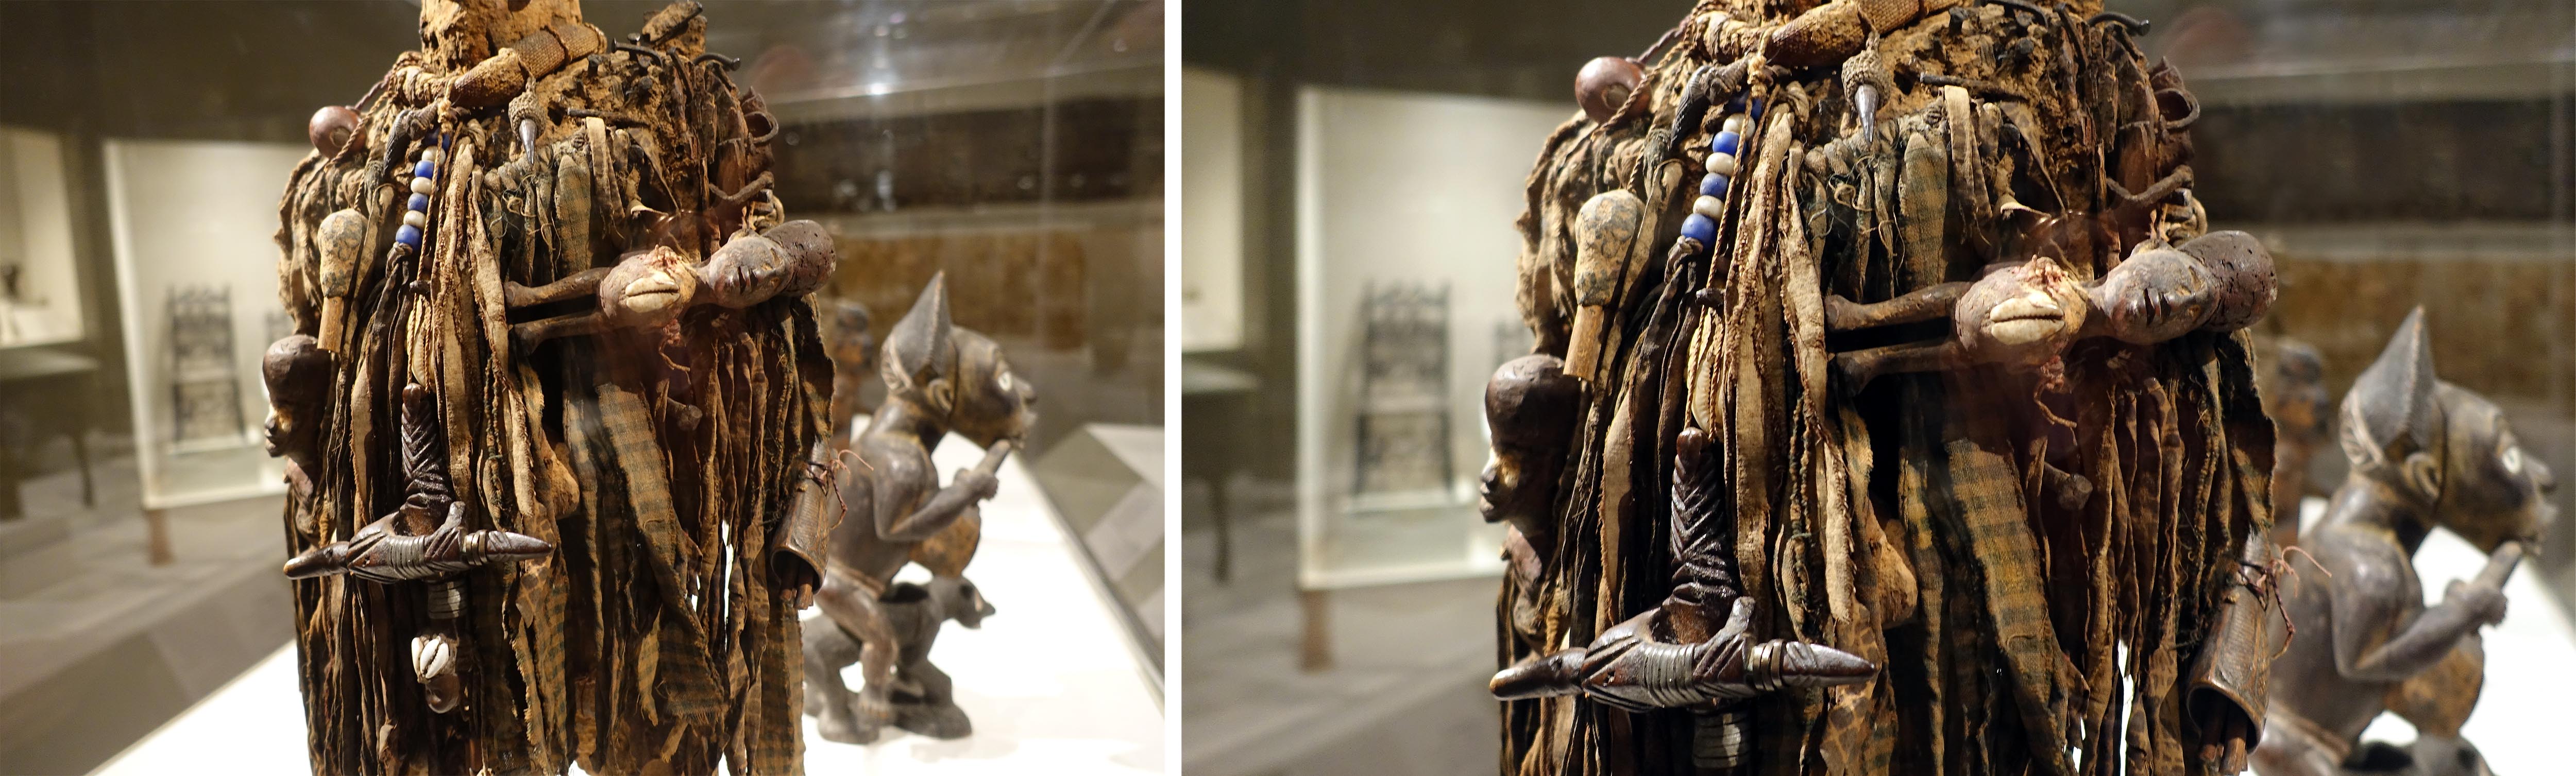
Left: unedited photo; right: edited photo. The angles and color have been corrected, and the reflections on the glass have been removed. (Power Figure: Male [Nkisi], detail, 19th–mid 20th century, Kongo peoples, wood, pigment, nails, cloth, beads, shells, arrows, leather, nuts and twine, 58.8 x 26 x 25.4 cm, The Metropolitan Museum of Art)
Cropping and saving
If you’re making a Smarthistory-style video, cropping your images to 16:9 will mean they’ll fit perfectly into the frame of the video, but this isn’t absolutely necessary; sometimes it’s nice to have an image that is a different aspect ratio to allow for pans, tilts, or zooms.
Save your image at the largest possible size. For video, you will want the highest resolution you can get (within reason). We use .jpg files with the quality set to “maximum” (though be careful of images larger than 10MB or so, since they will slow the performance of your video editing program).
Your own photos are likely not the only ones you will need for making your video. Check out our image search tutorial to guide you in searching for additional images.