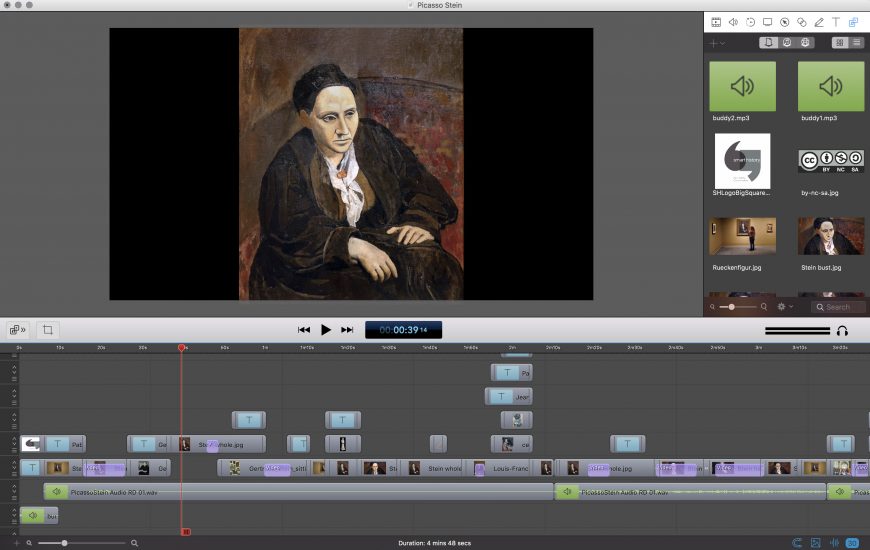
At Smarthistory, we currently use Telestream’s Screenflow editing software to make our videos. You can, of course, use any software you like. However, we recommend Screenflow because it is inexpensive, robust, and very easy to use—but its only for Macs. For PCs, there is a similar program, Camtasia.
The lesson below combines some of Telestream’s how-to videos with tips and tricks that are specific to how we edit at Smarthistory.
Jump to
- Document setup
- Overview of Screenflow
- Importing media into Screenflow
- Working with clips on the timeline
- Transitions and start and end points
- Adjusting your images
- Text and annotations
- Masking
- Adding movement
- Exporting and publishing
Document setup
We create 4k videos, with a canvas size of 3840 x 2160 (the largest preset). We export our videos as mp4s for uploading to YouTube.
Overview of Screenflow
An overview of Screenflow tools (video)
Importing media into Screenflow
Working with clips on the timeline
Tip: Make sure you always check that your audio levels are high enough when you lay down your audio track. You can adjust these levels in Screenflow on the Audio tab. Screenflow also includes options for things like smoothing audio levels and noise removal, which are sometimes helpful. Keep in mind though that audio filters can degrade quality, so listen carefully.
Transitions and start and end points
Note that you can also add a transition to any clip (including text and annotations) by right-clicking on the clip and selecting “add starting transition” or “add ending transition.” You can edit the length of your transition by grabbing the grey bar at the beginning or end of the transition and dragging it right or left. You can also do this by clicking the gear icon that pops up when you roll your mouse over the transition, and selecting “Show transition inspector.”
At Smarthistory, we always use dissolves for our transitions.
For changing the length of clips themselves, we like to use three handy keyboard shortcuts:
- Selecting a clip and pressing the “T” key will split the clip into two at wherever the playhead is set.
- Selecting a clip and pressing the “W” key will shorten the clip so that its starting point aligns with your playhead.
- Selecting a clip and pressing the “E” key will shorten the clip so that its end point aligns with your playhead.
These are especially useful if you need to line up several clips so that they begin or end at the same time—you can use these shortcuts on selections of multiple clips simultaneously.
You can also create or close gaps in your timeline (that is, you can move everything in your timeline closer together or further apart) by clicking and dragging the red tab at the very bottom of the playhead. This is useful if you suddenly realize you need to cut out a portion of your audio, for instance.
Adjusting your images
If you have more than one image that needs to be formatted the same way (for instance, you want them to have the same cropping or drop shadow settings), you can select Edit→Copy and then, with the new clip selected, use Edit→Paste video properties. This will copy the settings onto the new clip.
Once you have your images in place on the timeline, there may be moments when you decide to replace one with something else (a better version of the image, for instance, or an alternate work of art). Right clicking on your clip and selecting “replace media” will allow you to switch the image out for something else without having to go through the process of deleting and re-editing the whole clip on your timeline.
Text and annotations
How to add annotations (video)
Masking
Sometimes, you will want to darken parts of your image in order to highlight certain details. This is called “masking.” There are two ways to do this: you can mask things in Screenflow using freehand callouts (watch the video below for more information), or you can create masks for images in Photoshop using the Select and Mask tool, and then import those into Screenflow.
Freehand callouts in Screenflow (video)
Adding movement
Exporting and posting
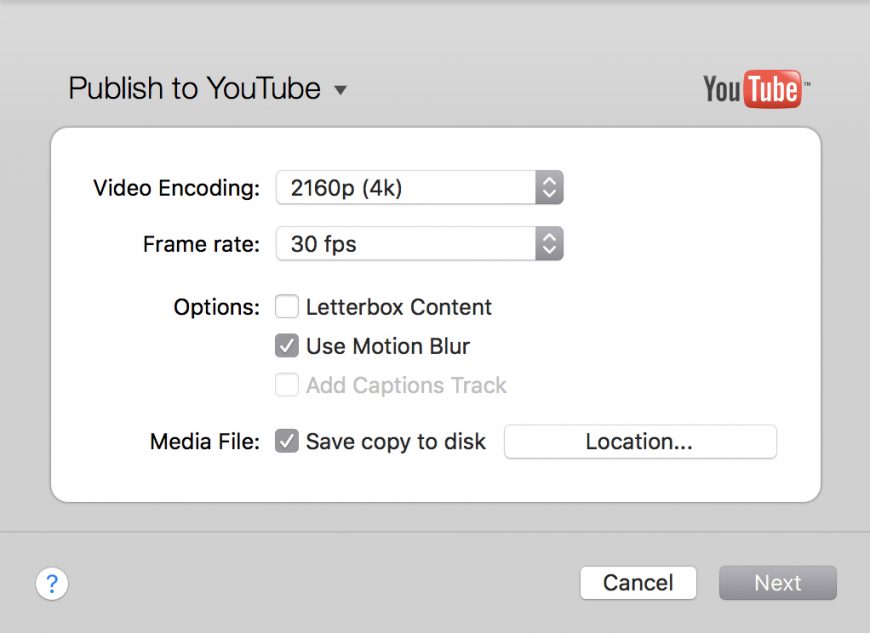
To export videos, we use Screenflow’s File→Publish to… function. We select “YouTube,” with the following settings:
If you click “Save copy to disk,” you must select a location on your hard drive. Screenflow will save a copy locally as well as posting it to YouTube for you.


