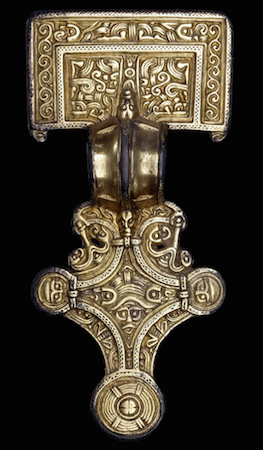
Silver-gilt square-headed brooch from Grave 22, early 6th century, Chessell Down, Early Anglo-Saxon, Isle of Wight © Trustees of the British Museum
One of the most enjoyable things about working with the British Museum’s Anglo-Saxon collection is having the opportunity to study the intricate designs of the many brooches, buckles, and other pieces of decorative metalwork. This is because in Anglo-Saxon art there is always more than meets the eye.
A love of riddles
The objects invite careful contemplation, and you can find yourself spending hours puzzling over their designs, finding new beasts and images. The dense animal patterns that cover many Anglo-Saxon objects are not just pretty decoration; they have multi-layered symbolic meanings and tell stories. Anglo-Saxons, who had a love of riddles and puzzles of all kinds, would have been able to ‘read’ the stories embedded in the decoration. But for us it is trickier as we are not fluent in the language of Anglo-Saxon art.
Style I
Anglo-Saxon art went through many changes between the 5th and 11th centuries, but puzzles and story-telling remained central. The early art style of the Anglo-Saxon period is known as Style I and was popular in the late 5th and 6th centuries. It is characterized by what seems to be a dizzying jumble of animal limbs and face masks, which has led some scholars to describe the style as an “animal salad.” Close scrutiny shows that Style I is not as abstract as first appears, and through carefully following the decoration in stages we can unpick the details and begin to get a sense for what the design might mean.
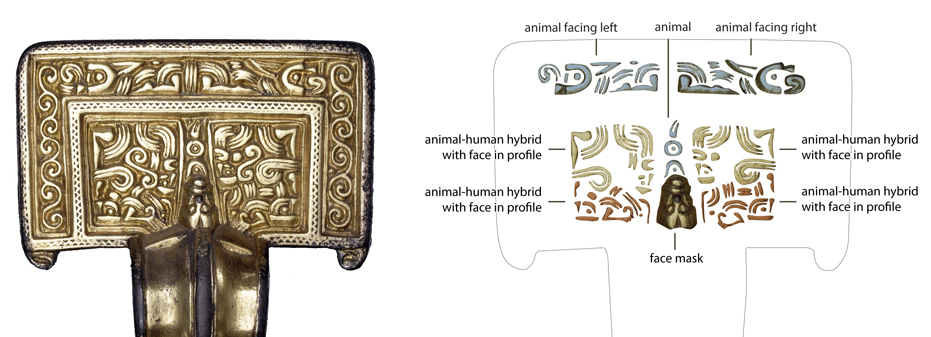
Decoding the square-headed brooch (top) © Trustees of the British Museum
One of the most exquisite examples of Style I animal art is a silver-gilt square-headed brooch from a female grave on the Isle of Wight. Its surface is covered with at least 24 different beasts: a mix of birds’ heads, human masks, animals and hybrids. Some of them are quite clear, like the faces in the circular lobes projecting from the bottom of the brooch. Others are harder to spot, such as the faces in profile that only emerge when the brooch is turned upside-down. Some of the images can be read in multiple ways, and this ambiguity is central to Style I art.
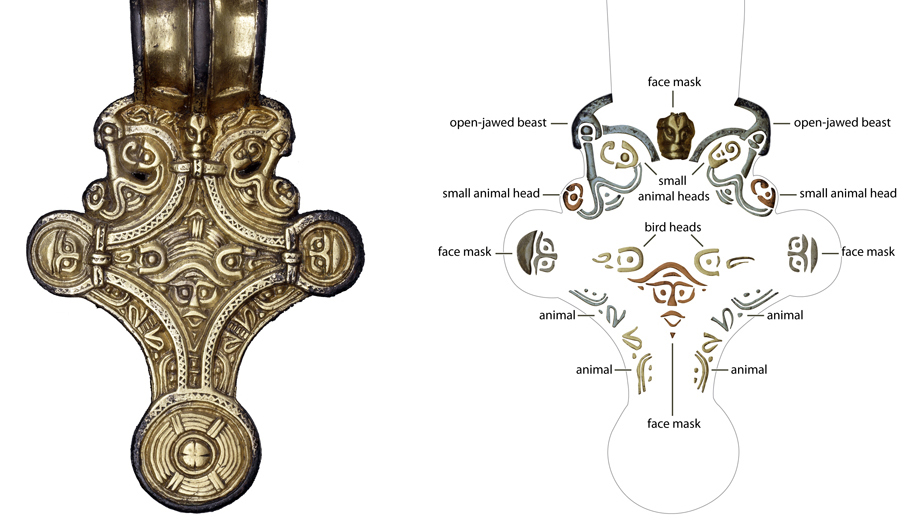
Decoding the square-headed brooch (bottom) © Trustees of the British Museum
Once we have identified the creatures on the brooch, we can begin to decode its meaning. In the lozenge-shaped field at the foot of the brooch is a bearded face with a helmet underneath two birds that may represent the Germanic god Woden/Odin with his two companion ravens. The image of a god alongside other powerful animals may have offered symbolic protection to the wearer like a talisman or amulet.
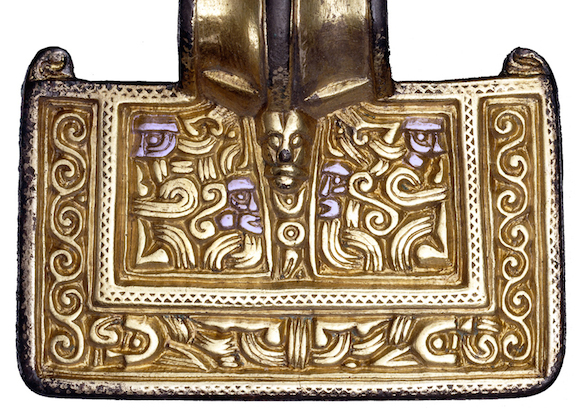 Turning the brooch upside-down (above) reveals four heads in profile on the rectangular head of the brooch, highlighted in purple.
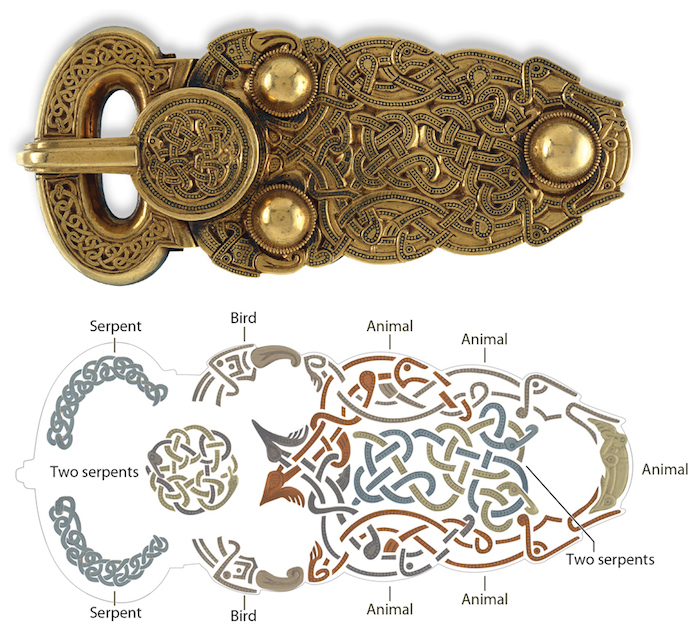
Decoding the great gold buckle from Sutton Hoo © Trustees of the British Museum
Style II
Style I was superseded by Style II in the late 6th century. This later style has more fluid and graceful animals, but these still writhe and interlace together and require patient untangling. The great gold buckle from Sutton Hoo is decorated in this style. From the thicket of interlace that fills the buckle’s surface 13 different animals emerge (above). These animals are easier to spot: the ring-and-dot eyes, the birds’ hooked beaks, and the four-toed feet of the animals are good starting points. At the tip of the buckle, two animals grip a small dog-like creature in their jaws and on the circular plate, two snakes intertwine and bite their own bodies. Such designs reveal the importance of the natural world, and it is likely that different animals were thought to hold different properties and characteristics that could be transferred to the objects they decorated. The fearsome snakes, with their shape-shifting qualities, demand respect and confer authority, and were suitable symbols for a buckle that adorned a high-status man, or even an Anglo-Saxon king.
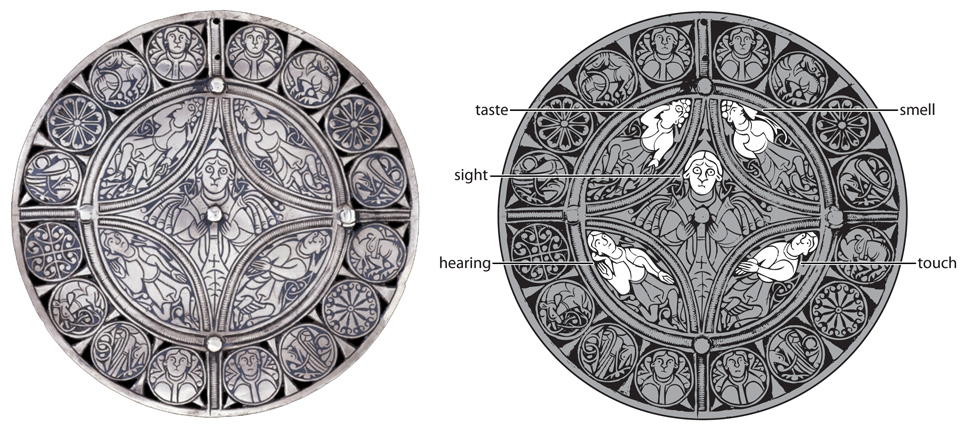
The five senses on the Fuller Brooch © Trustees of the British Museum
Further transformations
Animal art continued to be popular on Anglo-Saxon metalwork throughout the later period, when it went through further transformations into the Mercian Style (defined by sinuous animal interlace) in the 8th century and then into the lively Trewhiddle Style in the 9th century. Trewhiddle-style animals feature in the roundels of the Fuller Brooch (above), but all other aspects of its decoration are unique within Anglo-Saxon art. Again, through a careful unpicking of its complex imagery we can understand its visual messages. At the centre is a man with staring eyes holding two plants. Around him are four other men striking poses: one, with his hands behind his back, sniffs a leaf; another rubs his two hands together; the third holds his hand up to his ear; and the final one has his whole hand inserted into his mouth. Together these strange poses form the earliest personification of the five senses: Sight, Smell, Touch, Hearing, and Taste. Surrounding these central motifs are roundels depicting animals, humans, and plants that perhaps represent God’s Creation.
Sight and wisdom
This iconography can best be understood in the context of the scholarly writings of King Alfred the Great (died 899), which emphasized sight and the “mind’s eye” as the principal way in which wisdom was acquired along with the other senses. Given this connection, perhaps it was made at Alfred the Great’s court workshop and designed to be worn by one of his courtiers?
Throughout the period, the Anglo-Saxons expressed a love of riddles and puzzles in their metalwork. Behind the non-reflective glass in the newly opened Sir Paul and Lady Ruddock Gallery of Sutton Hoo and Europe 300-1100, you can do like the Anglo-Saxons and get up close to these and many other objects to decode the messages yourself.
Rosie Weetch, curator and Craig Williams, illustrator, British Museum
Originally published on The British Museum Blog
© Trustees of the British Museum